Join a scheduled Teams meeting
You may be requested to join a class meeting by your teacher. These meetings
The video will show you how to do it.
Teams is a collaboration app, much like Facebook, but limited to people in an organisation. So ours is limited to our school community. We can use it to chat, share and save files and have meetings. It works on almost every device connected to the internet through the webapps and most tablets, cell phones and pc's can download it. Here is a quick video to show you more.
You can get to Microsoft Teams 2 ways:
- Use the web app
- Use the desktop app
Use the Web App
Go to https://teams.microsoft.com/
OR
Use these quicklinks
|
Microsoft Teams Class Teamsites |
||||
|---|---|---|---|---|
| ... | Room 4 | ... | Room 56 | |
| Te Ruma 9 | Te Ruma 10 | |||
| Room 1213 | Room 14 | |||
Log in using your school email and password (contact your teacher if you do not know it)
OR
Use the Desktop App
Download the desktop Office 365 Apps as described here under ‘download Office 365 Apps
Click on the windows icon ![]() on the bottom of your screen and choose ‘all apps’
on the bottom of your screen and choose ‘all apps’ ![]()
Under ‘M’ select ‘Microsoft Teams
Log in using your school email and password (contact your teacher if you do not know it)

You should see a screen like this.
Click on the name of your class.
Once in your class group you can chat and use files.
In the 'Posts' tab will see any messages to and from your class to each other. Everyone in the team can see these messages.
This short video will show you how to communicate in Teams.

If you are unable to comment it is because you have been 'muted' by your teacher.
Use the @ symbol on your keyboard and start typing someones name to bring someones attention to your post. To bring the whole teams attention use the @team. Then type your message. When replying to someone elses comment, just hit reply and follow the same process.
If you wish to send a private message - use the  at the top of the screen.
This is where you can upload your files and view files other have uploaded.
You get to it by clicking on the 'Files' tab at the top of the screen once you have selected your class.
It is important to select your name (create a new folder if you don't have one) so that all your files are in the same place, unless your teacher has told you to put the files somewhere else.

Follow the steps above to get to the files tab.
Click on the file - this will enable you to view the file.
Click on the ellipsis (...) on the top right of the window if you wish to edit the file. Choose Open in Desktop App if you have installed the desktop app. Choose open in Browser if you have not downloaded the Desktop App.
Click the down arrow next to open and choose how you want to work on your file.

From the class team menu (follow the steps above on how to get there) - choose 'New from the top menu.
Then Choose the type of file you wish to create.

Files will be automatically saved into the folder you were in when you created it.
Once you are in the class site (follow the steps above) click on your name (create a new folder if necessary)
Drag and drop your files into your folder or click the upload option at the top of the Files tab.

Choose the file you want to upload and then click open. The file will automatically upload. You can select more than one file (max 10 at a time) to upload by ticking the boxes next to the file names.

The files will appear in the folder on teams once they have uploaded.
Click on the 'Close' button on the top of the file to close the file when working in Teams. Files are automatically saved in the Teams Webapp.

To give your files a name that will make more sense you may need to rename it.
Make sure the file is closed.
Hover your mouse over the file you wish to rename. Click on the ellipsis (...) next to the file name in your teams folder.

Choose 'Rename' from the drop-down menu

Type the name you want for the file - choose something that means you will know what it is without opening the file, then click 'Save'

Open the file in Teams
Click Start Conversation on the top right hand side

Type '@' and then start typing the first name of the person you wish to chat with without any space between @ and the name. Suggestions will pop up and you can click on the one you need. You can select more than one by using the @ symbol and typing their name and clicking on it. To select the whole team type '@team'

The tagged person / people will have an alert message to tell them someone is trying to chat when they are online. Everyone can see the messages even if they are not alerted by your @ but will not get a alert message unless @ mentioned.
To talk privately with your someone click the create chat on the top of the main team screen. Use the same method of mentioning as above (@name)
You may be requested to join a class meeting by your teacher. These meetings
The video will show you how to do it.
Use Immersive Reader in Microsoft Teams
Hear posts, chat messages, and assignments read aloud using Immersive Reader in Microsoft Teams. Immersive Reader also includes grammar tools such as Parts of Speech and Picture Dictionary.
Launch Immersive Reader from a message
-
Hover over a message with your cursor or tap with your finger on a touch screen device.
-
Select More options
 , and then Immersive Reader
  .
.
Immersive Reader will launch as a full-screen experience.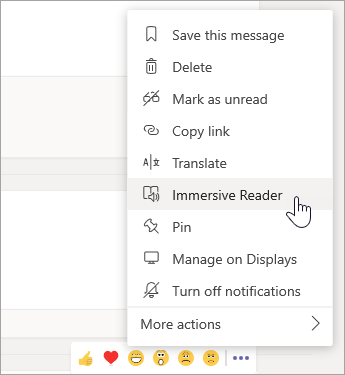
Launch Immersive Reader from an assignment
Open an assignment and select Immersive Reader .
Immersive Reader will launch as a full-screen experience.
Immersive Reader features
You can do one or more of the following in Immersive Reader, depending on how you'd like to focus on the message or assignment text.
-
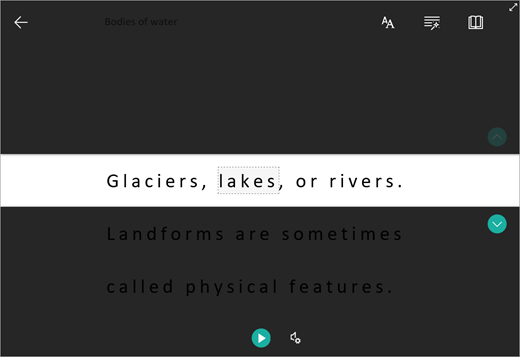
Select Play to hear your document read aloud and to see the text highlighted simultaneously. The narrator starts reading from the top of your page by default, unless you have selected a word, in which case it will start reading from the selected word. Select Pause to stop narration.
Select Voice Options on the top right of the document to change the speed of narration.

-
Text Options
You can change the appearance of your document by using Text Options. Text options can help you focus on your content and remove visual distraction.
Set Text Size, Spacing, Font, and Themes that suit your learning needs. You can increase or decrease text size and the amount of spacing between letters and words. The Theme color you select becomes the background color of the document.
Switch on Show Source Formatting to retain formatting from the original text, such as bolding or underlining.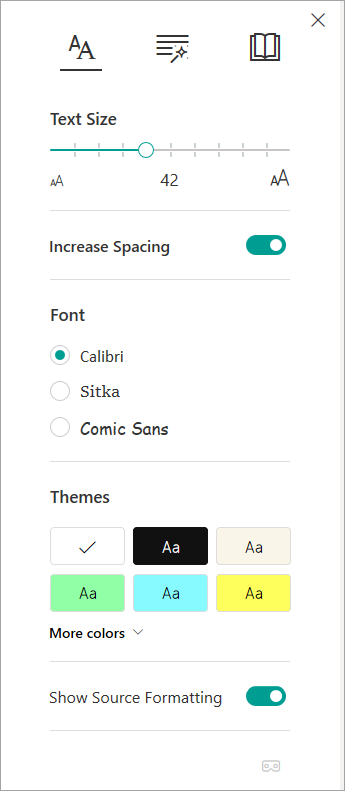
-
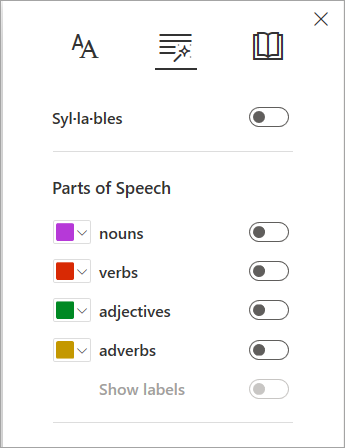
Parts of Speech in Grammar Options
Select one or more of the following options:
-
Syllables to break words into syllables.
-
Nouns to highlight nouns in your document in purple.
-
Verbs to highlight verbs in your document in red.
-
Adjectives to highlight adjectives in your document in green.
-
Adverbs to highlight adverbs in your document in yellow.
Switch on Show labels to see the label underneath the highlighted parts of speech.
-
-
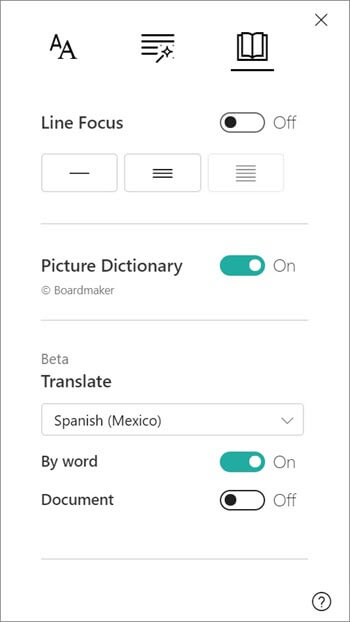
Reading Preferences
-
Line Focus enables readers to narrow the focus of their reading experience by highlighting sets of one, three, or five lines within their chosen material in Immersive Reader. Use the toggle to turn it on or off.
-
Picture Dictionary gives you the ability to click on any single word to hear it read aloud and see a picture that helps define the word.
-
Translate lets you translate your text into other languages by word or document.
-
Select Close to exit Immersive Reader.